Friday, December 7, 2012

CURRY CHICKEN SALAD WITH CUCUMBER MINT RAITA


Yo my peeps! How long it’s been, how I've missed your faces! You look like you've lost weight.
I've been waiting for something to put up here, but have been uninspired… UNTIL NOW, you lucky hungry bastards. In my humble opinion this little recipe is worthy of the Interwebs. It’s for one of those days where you want something easy, distinctly curry-ish, something filling and yet healthy – you put this in your mouth, and enjoy it. Feeds 4 hungry souls.


 For the curry chicken: 
2 large cooked chicken breasts, from a rotisserie roasted chicken is fine, roughly hand shredded (yields about 4 cups meats)
1 med. onion, chopped
1 garlic clove chopped
1 tbsp curry powder
1 tbsp fresh grated ginger, or 1 tsp. powder ginger
1 tsp crushed red pepper (optional)
2 chopped tomatoes or 1 14oz can chopped tomatoes of any kind
1 cup plain Greek yogurt
2 tbsp chopped cilantro
1-2 tbsp vegetable oil
1 ½ tsp salt

For the mint Raita: 
(can be made up to 2 hrs ahead, put’er in the fridge to marinate in‘er juices)
  • 3/4 cup plain Greek yogurt
  • 1 cucumber, peeled and seeded, chopped in small cubes.
  • 2 tbsp chipped mint
  • ½ tsp salt.
  •   

To make the chicken salad: shred the chicken in a separate bowl while trying to keep away the cats/dogs/boyfriends creeping by and stealing the chicken.  Add 1 cup yogurt & cilantro to the chicken, set aside. Saute onion, garlic and ginger in the oil on medium heat  until someone yells at you to put on the exhaust fan; this takes about 5 mins.  Add cumin & curry powders, crushed red pepper and 1 ½ tsp salt, sauté for 2 more mins. until your hair smells like an Indian curry house.( Yes, you’ll be that house on the block that smells of curry this night, but I digress). Add the tomatoes and sauté covered on medium-low heat for about 5 mins, until mixture begins to thicken.
 Remove this shit from heat and add to the chicken and yogurt, mix thoroughly and let stand until room temperature. Serve with warm Naan bread and mint Raita. TRY to share w/ your guests, ‘cuz this shit be tasty. Holla!
Bonus: when you wake up the next morn, your house will still smell like curry. Here's the money shot:


Monday, July 9, 2012

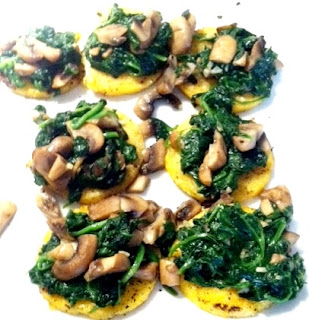
Grilled Polenta with Spinach & Mushrooms


It's been so long! You don’t call… you don’t write… so sad. But I love you anyways, so here’s another installment of something that was con-cocted over the weekend. Since it’s grillin’ time, we shall implement the grill for this.


Large Polenta log ( in the pasta section usually)
Large bunch of spinach
Cremini mushrooms
2 cloves garlic
2 tbsp butter
Salt/pepper


To concoct ( makes about 15):

Slice the polenta log into ¼’ thick circles. I hope you had the good sense to remove it from its plastic condom before slicing. Brush with olive oil on both sides, salt/pepper. Grill each side directly on the grates, about 6 min/ side. Set aside. Sautee sliced mushrooms w/ 1 tbsp butter until nice and tan, remove from pan, salt. BTW – a secret to a nicely browned mushroom is #1) do not crowd the mushrooms, #2  -use medium high heat, #3 – salt AFTER they cook. Otherwise they release moisture in the pan and never brown, just grossly stew. But I digress…. Remove the mushrooms, sauté minced garlic until fragrant in the other tbsp. butter, and throw in some spinach until wilts, about 3-4 mins. Add more butter if you want, and make a mental note to run 2 extra miles next time. Once spinach is sautéed, pour out the spinach water from the pan. Add mushrooms, salt/pepper to taste, and top the polenta circles with some-of- dat. This is pretty freakin’ good hot or cold. Miss you, love you, call me, we'll lunch!


*Credits to Tomas Smit for the idea! 

Thursday, May 24, 2012

Semi- Jerk Chicken Drumsticks


Hello! Welcome! Or rather, I welcome myself back after some time away of not eating. I have something easy for ya’ll today, but this one you have to have a food processor. This cray –hot marinade sauce just doesn’t work any other way, people. So go buy one already.
*Eric: the rosemary sprig in the picture I stole from your garden. Sucker!

Yee shall need:
10 chicken drumsticks, skin removed – or not. I remove the skin.
10 scallions
1 Habanero chile (or a Scotch Bonnet, if you like fire), seeds removed & coarsely chopped
2 tbsp white vinegar
1tbsp thyme( fresh or dried)
1 ½ tsp Allspice
1tbsp salt
½ tsp black pepper
Oil or cooking spray for broiler pan.

Ok. This is what: throw everything but the chicken stumps in the food processor, pulse to death to a pasty obedience. Marinate the chicken stumps in this for about 30 minutes. Preheat broiler to HI, put oven rack in the center of the oven. Hopefully you remembered to do this before preheating the oven, and get to keep your eyebrows and facial skin. Spray broiler pan or oil it up so the chicken don’t stick, slick. Arrange drumsticks in the broiler pan, salt thoroughly some more. Broil on HI (turning once or thrice) for a total of about 30 mins, until delicious charred crusties form. Enjoy, but I caution: this is just as spicy on the way out, as on the way in. Cray!


Friday, March 30, 2012

Raw Shaved Asparagus salad with Avocado


So here’s a little something’-somethhin’ from the “no-cook-vegan” part of our cookbook. Raw Shaved Asparagus salad with Avocado. The asparagus was getting kinda hairy, so we shave it. Just kidding. Super easy & tastes like a grassy knoll. Looks pretty on a plate though! 1 bunch (about 14) thick asparagus stalks makes 5 servings. Trim about 2” of the tough asparagus ends, and shave each stalk into thin ribbons with a vegetable peeler. Squeeze 2 tbsp of fresh lemon juice and add olive oil to a large bowl, add asparagus, salt & pepper to taste, mix and let marinate in the fridge for about a hour, mixing occasionally.  Serve with few slices of avocado, and enjoy your pee as a bonus. 

Wednesday, March 28, 2012

Rice Crispy Treats on steroids


Is it possible to develop objectophilia (...a pronounced emotional and often romantic desire towards developing significant relationships with a particular inanimate objects (Wiki)) towards a desert? Apparently it is.
I don’t know what it is about me and marshmallow-based deserts lately, must be that time of the month…. anywho…These pieces of goodness will make you love them at first bite, or at the very least put you into a sugar coma. 

 To make about 16-18  2x2 squares yee shall need:

2 heaping cups marshmallows, large or small
2 cups Rice Krispies cereal
1 teaspoon vanilla extract
½ cup dried cherries or cranberries
½ cup crushed thin pretzels
½ cup semi-sweet chocolate chips
1 cup grated coconut, divided into 2 equal parts.  


Toast the coconut in the oven on 375 until golden brown, about 3-4 mins. Reserve ½ cup for later. While you are saliva-ing over the smell of toasted coconut, crush pretzels into small pieces; I like to do that by putting the pretzels into a zip lock bag and beating the crap out of them with something heavy. Pretzels crushed, I feel better, and 7 calories burned. Win-Win-Win.. Melt the marshmallows over medium/low heat stirring often for about 7 min.until fully melted, then incorporate vanilla extract. Remove from heat, add rice krispie cereal, ½ cup toasted coconut, dried cherries, crushed pretzels, and mix everything until evenly mixed. Working quickly, dump the whole sticky mess into a 9 x 13 parchment paper lined pan. When lining the pan with parchment paper, do yourself a favor and have enough there to close the parchment over the pan once the contents are in the pan. Press down over the parchment so the rice crispy mixture is of uniform thickness. You’ll need to let it cool completely, which  - you eager beavers - takes about 30 minutes. You can put in the fridge to cool faster if you must. Once the rice sheet cools, cut it into squares.(I hope you removed the parchment first). In the mean time occupy yourself by melting the chocolatechips in a bowl set over a simmering pot of water until fully melted. Dip one side of each square into the melted chocolate, then into the remaining toasted coconut. Let cool completely before serving. Enjoy your objectophilia!  


Thursday, March 22, 2012

Shrimp Ceviche


It’s Shrimp Ceviche people! The ultimate no-cook summer treat!! Freakin’ tiny shrimp!!! Yay!!!!.... You’ve probably noticed that I’ve been lazy lately & don’t really feel like turning on the stove, so you’ve seen me post stuff like those marshmallow 5-minute owl faces... So if you’re like me right now – then this should be right up your alley. This could not be easier to make. Well, I guess it could be easier to make, if you just float all the ingredients whole in a bowl of lime juice, but hopefully you will give your guests the courtesy of a small dice at this par-tae.  Typically the recipe calls for cucumber, I didn’t have any so I used a tomato here. Whatevs, it’s still good.

You will need:
  • 1/2 cup (preferably fresh ) lime juice 
  • 1 lb tiny cooked shrimp.
  • 1/2 red onion, diced  
  • 1 jalapeno, diced very small
  • 1/3 cup chopped fresh cilantro
  • 1/2 cup ketchup (or chili sauce)
  • About 2 tablespoons olive oil
  • 1 cup seeded diced peeled cucumber
  • 1 small ripe but firm avocado,  cubed
  • Salt

Toss the shrimp with lime juice, cover and refrigerate for about an hour. In a small strainer, rinse the onion under cold water, then shake off the excess liquid, ‘cuz you be cryin’ otherwise. Add to the shrimp bowl along with all other ingredients. Taste and season with salt. Cover and refrigerate if not serving immediately. BAM!  Serve with tortilla chips, or whatever other scooping agent you find palatable. PS: you can also substitute firm white fish like sea bass, if you have a fatal allergy to shellfish, or if you’re fancy. 

Wednesday, March 14, 2012

S'more treats


OMG people, here’s a treat for you. If you’re having “one of those nights” I suggest you sweep your pantry, and give yourself a mouthgasm with these.(Side note: the word “mouthgasm” is underlined in red, a.i. “not a word” according to Webster. As I right clicked to spell check it, it corrected to “Mouthwash”. Fail!)


All you need:
Crackers, broken in 2
Large Marshmallows, cut into circles
chocolate chips
5 minutes.

Assemble. Broil on low for a few minutes, not leaving the site. Remove. Notice how they stare creepily at you. Gorge. Regret. Gorge some more. WIN!  

Friday, March 9, 2012

Chicken & Wild Rice Soup


Hellooooo my peeps! I am back! Technically I was here all along, successfully ignoring your cries for more blog. But I have missed you, and soup, and so it goes like this: today we are making Chicken & Wild Rice  Soup. It’s so easy even a monkey can do it (yea, I’m talking to you.. you know who you are…). 15 minutes hands on, then it pretty much cooks itself.  


Yee shall need: 
  
2 large chicken breasts
1 yellow onion
2 cloves of garlic, chopped
3-4 cups chicken stock
½ cup dry wild rice  
1 can of chopped stewed tomatoes  
1 large carrot or 2 small ones, cut into circles
½ cup frozen corn kernels. 
Salt & pepper to taste
Crushed red pepper
3 tbsp lemon juice
Parsley ( flat leaf or curly, whatevs. )


Cut up chicken into mouth-manageable cubes (no larger than 1”).  Season chicken well with S&P. ( Notice my “Rachel Ray” EVOO approach to salt & pepper here).  Chop the onion and garlic, and brown with the chicken in a large soup pot with some vegetable oil for about 10 minutes on medium heat, until chicken has a nice base tan. Add the chicken stock to the same pot; add more water if need more liquid. Throw in dry wild rice, tomatoes, corn, & carrots. Add 1/2 tsp crushed red pepper and about 4 tbsp chopped parsley.  Cover, bring to boil, turn down heat and simmer on LOW about 40 minutes. Remove from heat, add salt / pepper to taste if needed, and about 3 tablespoons of lemon juice. Let stand covered for about 20 mins. to an hr.
Serve with fresh chopped parsley, and more crushed red pepper if you like ulcers. 

Tuesday, January 24, 2012

Zucchini Pancakes


Are there any vegetarians up in here? Holla! This one’s for you. I strongly recommend that you invest in a food processor. And not just the 2 cup-mini prep one you cheapskate, those suck. Aside from a lost finger or two they really do make your life a lot easier. If you don’t own one – that’s cool -just use a grater like a caveman. 
I present, the Zucchini Pancake.

You will need (for 6-7 cakes):

 2 large zucchinis, grated.
1 egg, beaten
1 tsp white or wheat flower
1/2  tsp cumin
1/2 tsp salt
ground black pepper
Sour Cream
Sriracha (optional)


Grate the zucchinis in the food processor, or the pre-historic way on a grater. Just make sure to grate on the large holes, and please be considerate and remove any knuckle skin that you may have inadvertently grated into the bowl. Salt the shredded zucchini, mix thoroughly and leave to drain in a colander for about 15 minutes so it releases liquid. Squeeze as much  liquid out from the zucchini as possible. Drink it. Just kidding, that’s disgusting. Discard it. In a separate bowl mix the rest of the ingredients with the beaten egg. Add zucchini, and mix thoroughly. Heat 1-2 tbsp olive oil in a large skillet, form the zucchini mixture into flat-tish cakes about the size of your palm, and fry on medium heat COVERED for about 7 minutes, or until browned. Uncover, flip the cakes and brown the other side for about 5 minutes on medium. Serve with a dollop (Gawd, I hate that word) of sour cream and a spooge of Sriracha.
Woo-Hoo! Peace out. 

Wednesday, January 18, 2012

Spicy Ahi Tuna


What’ up, my Peeps!
It’s been ages since I’ve seen you. I missed you. Did you miss me? I hope you’ve been well. Today, for your pleasure, I have con-cockted this Ahi Tuna Poke. It’s spicy, it’s tasty, and this beats paying $16 for it at the restaurant. You will need all (or at least most) of the items below, plus some Mayo which was too shy for the photo shoot. It was being fussy and having a bad hair day. But I digress….

You Will need:
Palm-sized sushi grade Ahi Tuna steak, diced into small cubes.
2 tsp. Soy sauce
½ tsp. Sesame Seed oil
1 tsp Sriracha hot sauce
1 tbsp Mayo-nayo-naise
½ tsp chili paste (optional)
1 tsp rice vinegar (optional)
½ tsp Sesame seeds
1 tbsp chopped cilantro


Here’s “just the tip” before starting: prior to dicing, put the tuna steak in the freezer for about 20 minutes. It’s way easier to dice this way, otherwise you will end up with mashed up tuna blobs, not pretty. Dice the aforementioned tuna into small-ish dice. Mix all other ingredients except sesame seeds in a separate bowl & dump in the tuna dice. Mix thoroughly, refrigerate for about 20 mins.  Serve on a cracker, or just as is. Thank me later with a shoulder massage, ‘cuz this recipe is the shit. 

Tuesday, January 10, 2012

Crispy Skin Roasted Chicken


Today I will solve the ancient problem of soggy chicken skin with this simple roasted chicken recipe. The best part is that you will never look at a Bundt cake pan the same way again, and neither will your chicken. Yup, you heard me. I present to you the  Roasted Chicken in a Bundt pan. Why, you ask? Because  the chicken likes it that way. You know you probably have an old Bundt pan that you bought for some crappy recipe that you never made again. Dust her off, it will become one of your favorite accessories to roast a chicken in. Or, rather, On. The chicken and the Bundt pan will become very close and intimate friends. 
 You will need:

Bundt Pan
One willing chicken
Kitchen twine
Salt (1/2 tsp, or more) & ground black pepper, to taste

Preheat oven to 450. Pat the chicken very dry inside & out with paper towels. The drier the better. Season the chicken generously inside and out with only salt and ground black pepper. You can get fancy with other seasonings if you wish - I don’t – the chicken is delicious with just those two basics. Mount the chicken on top of the Bundt pan. Giggle to yourself because you’re immature, and tie the chicken up once with kitchen twine around its wings, pinning the wings close to its pale salty body. See picture above.  Bake at 450 for 60-65 minutes. Do not open the oven, do not baste, don’t do anything. This is a completely hands-off experience for you and the chicken. Once the chicken skin is brown and crispy, you may take it out of the oven & let rest for 10 minutes before dismounting it off its anal probe. Enjoy, while silently apologizing to the bird for what you just did to it. 

Friday, January 6, 2012

Mini Cherry & Nutella Pies

Welcome back, my little lemurs! Baking has always scared me, but being a huge fan of cherry pie and not wanting to get a fat ass from buying a lard-loaded pie from Coco's I came across a recipe on a website that rhymes with "Killsberry", and this one is loosely based on that. These are somewhat of a production to make, but the ingredients are readily available, and the end result is impressive. Also, please realize that these puppies are about 2.5" in diameter, so you can probably fit about 3 of them in your mouth at once.  
Behold, the Mini Cherry -Nutella pies. 


The Ingredients: 
1 package of refrigerated pie crust dough. I like the Pillsbury dough. .
1 can of Cherry Pie filling.
Nutella, or other hazelnut spread.
1 egg
2 tbsp melted butter
Sugar


The Assembly: 
Preheat oven to 375, or whatever your pie crust recipe requires. Package of this refrigerated comes with 2 rolls, each roll makes about 10-12 mini pies. Bring dough to room temperature; otherwise, it's a bitch to roll out. Lightly flower your work surface & a rolling pin. BTW, a big thick wooden dowel from a hardware store works awesome as a rolling pin. Too bad I didn't know that before splurging on a fancy  $14 rolling pin. Roll out the dough slightly, to make more pies. Cut dough circles of a desired size, I like using cookie cutters no bigger than 3". There will be dough scraps left, ball them up and roll out again. Once you have used up the dough, you are ready to assemble. Smear about 1/3 tsp Nutella in the middle of each circle, plop 3 cherries on top, and another dough circle to cover it all up.  Crimp edges with a fork.

In a separate bowl beat egg with the melted butter to make an egg wash. Brush the top and bottom of each pie with the egg wash. Cut 3 SMALL slits in each pie so the pies don't explode whilst baking. Sprinkle with regular 'ole granulated sugar. Bake until pies are nice and golden, and screaming, about 15-18 mins. If you notice some filling leaking out during baking, you've totally screwed this whole thing up. Just kidding, it's totally normal. Now try to resist the urge to stuff your face until these sufficiently cool, or you will loose a layer of your mouth skin.

WARNING: be prepared to ward off accusations that you bought these at the store, and re-plated them. I did.


P.S. I tried making with Apple cinnamon and caramel filing, cherry tastes better. 

Thursday, January 5, 2012

Slow cooker Adobo Chicken

Now, my peeps, this little gem is Chicken Adobo in a Crockpot. Or a Slow Cooker. Whatever term you fancy. I can't take credit for the base recipe, however I did tweak it, so... it's mine now. Thanks Peter! It's easy, it's hands off, and it comes out perfect every time. And as a bonus, people think you slaved over this for hours. Suckers! 


The ingredients: 
½ cup balsamic or apple cider vinegar 
½ cup regular soy sauce
1 tsp. ground or fresh grated ginger
4-6 garlic cloves, peeled
1 red onion
2 bay leaves
1 tbsp. black pepper
1 tsp. brown sugar
1 large package of chicken thighs, or thighs/drumsticks mix  (roughly 10-12, or until your slow cooker screams "No More"!)
1/2 bunch chopped green onions or chives, for serving 

The How To: 
Remove skin from chicken, place in bottom of cooker (the chicken, not the skin). You could, technically, leave the skin on, but you and I both know that you could probably loose a few lbs, so let's just follow my directions, mmkay? Peel garlic and onion, chop roughly, mix with ginger and add to the chicken.  

Mix Vinegar, Soy Sauce, Brown Sugar, and Pepper in a separate bowl.  Taste and adjust the soy sauce/vinegar.  You can always add more vinegar if you like it tangy, but you can't take it out, yo!  
Add sauce to chicken and hand mix so all ingredients are mingling in a friendly fashion.  It doesn't have to be perfect, people. Add the bay leaves and fire that sucker up to cook on low for 8 hours. Don't blame me for the electrical fire you started in your absence b/c you still own the janky Crockpot your grandma gave you form the 60's. 

Meal will be ready and willing in about 8 hrs. Serve over rice and add chopped green onions as a garnish. Congratulate yourself for a job well done, and make sure to credit me for this recipe. TTYL! 


Salmon Roe & Cream Cheese on cucumber hors d'oeuvres

All-righty. Here's the 1st order of weirdness. If you are like me, and will put anything in your mouth ... wait, that may be misconstrued...oh well. Anywho, try these little morsels of salty goodness: Simple, requires little assembly, & looks cool. And  as an added bonus, you get a side of high blood pressure from all the yummy sodium.You're welcome! 

                 
Ingredients: 
1/4 Cup Salmon Roe
1/4 Cup softened Cream Cheese
1/2 Cucumber ( cut into slices)
Ponzu sauce, and optional Sriracha hot sauce if you lika'da Sa-piicyyy! 
Fresh dill for decoration 

Assembly:
Cut cucumber into slices. I prefer using the English Cucumbers, less seedy. Top with a dollop of cream cheese. If you have one of those squeezable frosting bags that you can squeeze the cream cheese out of in a decorative way, use that. I, personally am too cheap to buy one so I used a Ziploc bag with a cut off corner creating a tasty circular cream cheese half-turd. Put about a half tea spoon of Salmon Roe into that, and add a splash of Ponzu sauce on top. If you want some kick, squirt (he-he) a drop or two of Sriracha on top. WARNING: some people hate salmon roe. F*%$ those people. Someone will eat this, I promise.